Some of you may be surprised to know that the UV4L Streaming Server not only provides its own built-in set of web applications and services discussed extensively in other tutorials, but also embeds another general-purpose web server allowing the user to run and deploy her own custom web apps. It’s “two servers in one” (listening to two different ports).
In this example we will see how to use the Streaming Server to serve a custom peer-to-peer web application which does the following in the browser:
- contact the WebRTC web service on the server itself to ask for a live 30fps video stream from a camera;
- embed the video stream into an HTML5 page in the browser;
- process the video in real-time (face detection) with the OpenCV.js library in plain JavaScript.
Any browser on any device (PC, Android, etc..) should be supported and no third-party plug-in needs to be installed, as this example is entirely based on web standards.
For the sake of simplicity, we will deploy this web app on a Raspberry Pi with a camera module connected to it, although the procedure would be the same with any other supported architectures or video devices. It is left as an exercise for the reader to remove the video processing step, if not needed.
First of all, install all the packages required according to these instructions, typically: uv4l, uv4l-server, either uv4l-webrtc or the one specific for your architecture (e.g. uv4l-webrtc-armv6) , uv4l-raspicam, uv4l-raspicam-extras and uv4l-demos.
Log into the Raspberry Pi, edit the default configuration file /etc/uv4l/uv4l-raspicam.conf, uncomment the following options and leave them as follows:
server-option = --enable-www-server=yes
server-option = --www-root-path=/usr/share/uv4l/demos/facedetection/
server-option = --www-index-file=index.html
server-option = --www-port=80
server-option = --www-webrtc-signaling-path=/webrtc
To know what those options mean please refer to the server manual. Restart UV4L with the following command:
$ sudo service uv4l_raspicam restart
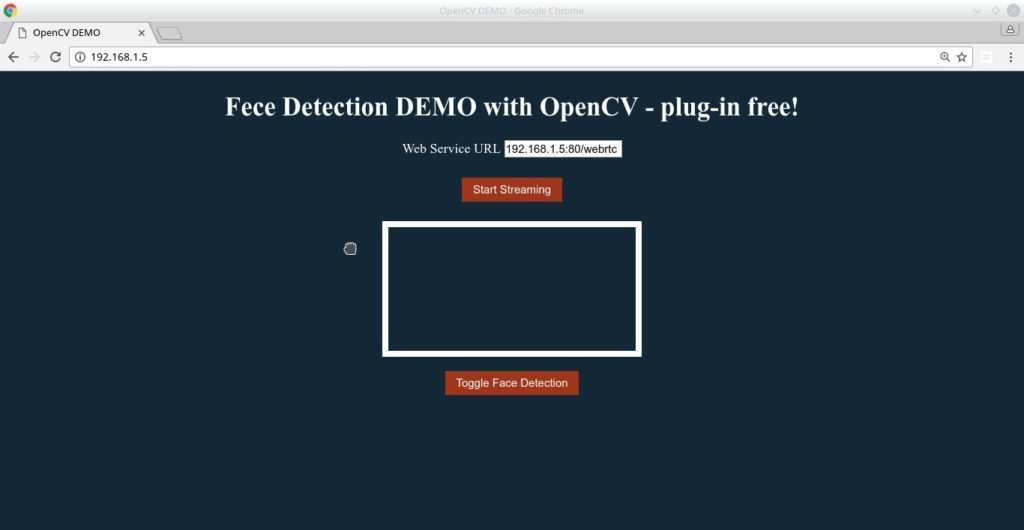
You can now connect to the Streaming Server with the browser. The URL should be something like http://<rpi_address>, where <rpi_address> has, of course, to be replaced with the real hostname or IP address of the Raspberry Pi in your network. A page like the following should appear in the browser:

As you are downloading this web app from the server, the Web Service URL field should already be filled for you with the correct address, so just press the Start Streaming button to receive and see the live stream inside the white box, and press the Toggle Face Detection button to turn on and off face detection on-the-fly on the received video. Whenever a face is detected, a red rectangle surrounding it should appear in the image:

The source code of the web app is installed in the filesystem under the path /usr/share/uv4l/demos/facedetection/, which consists of:
- index.html, the HTML5 page containing the UI elements (e.g. <video> and <canvas>);
- main.js, glue code (e.g. callbacks triggered on user actions like “start the streaming on mouse click”);
- signalling.js, implementing the WebRTC signaling protocol over web socket (e.g. negotiate the resolution, the H264 compression and other options) ;
- face-detection.js, code that makes use of the OpenCV.js library to detect faces on the canvas;
- cv.js, cv.data, the OpenCV.js library itself.
The signaling aspect is probably the most interesting thing, in that is the key for UV4L to be integrated with other third-party WebRTC-based frameworks (remember that WebRTC is not limited to browsers).
Of course, this is just the tip of the iceberg. You can enhance or fork this simple web app in order to also support, for example, audio processing in the browser or, more in general, bidirectional streaming of audio/video/data that allows to implement funny things like the FPV robot shown in this demo. For a more comprehensive example about 2-way audio/video/data you can always take inspiration from source code of the built-in page available at http://<rpi_address>:8080/stream/webrtc. For more sophisticated N-to-M peers scenarios like video rooms, see this.
If you want to experiment generic real-time, face or object detection with Tensor Flow models in your Raspberry Pi (server-side), you might be interested in this other tutorial.